Recipe: How to make banh mi two ways, and bun cha

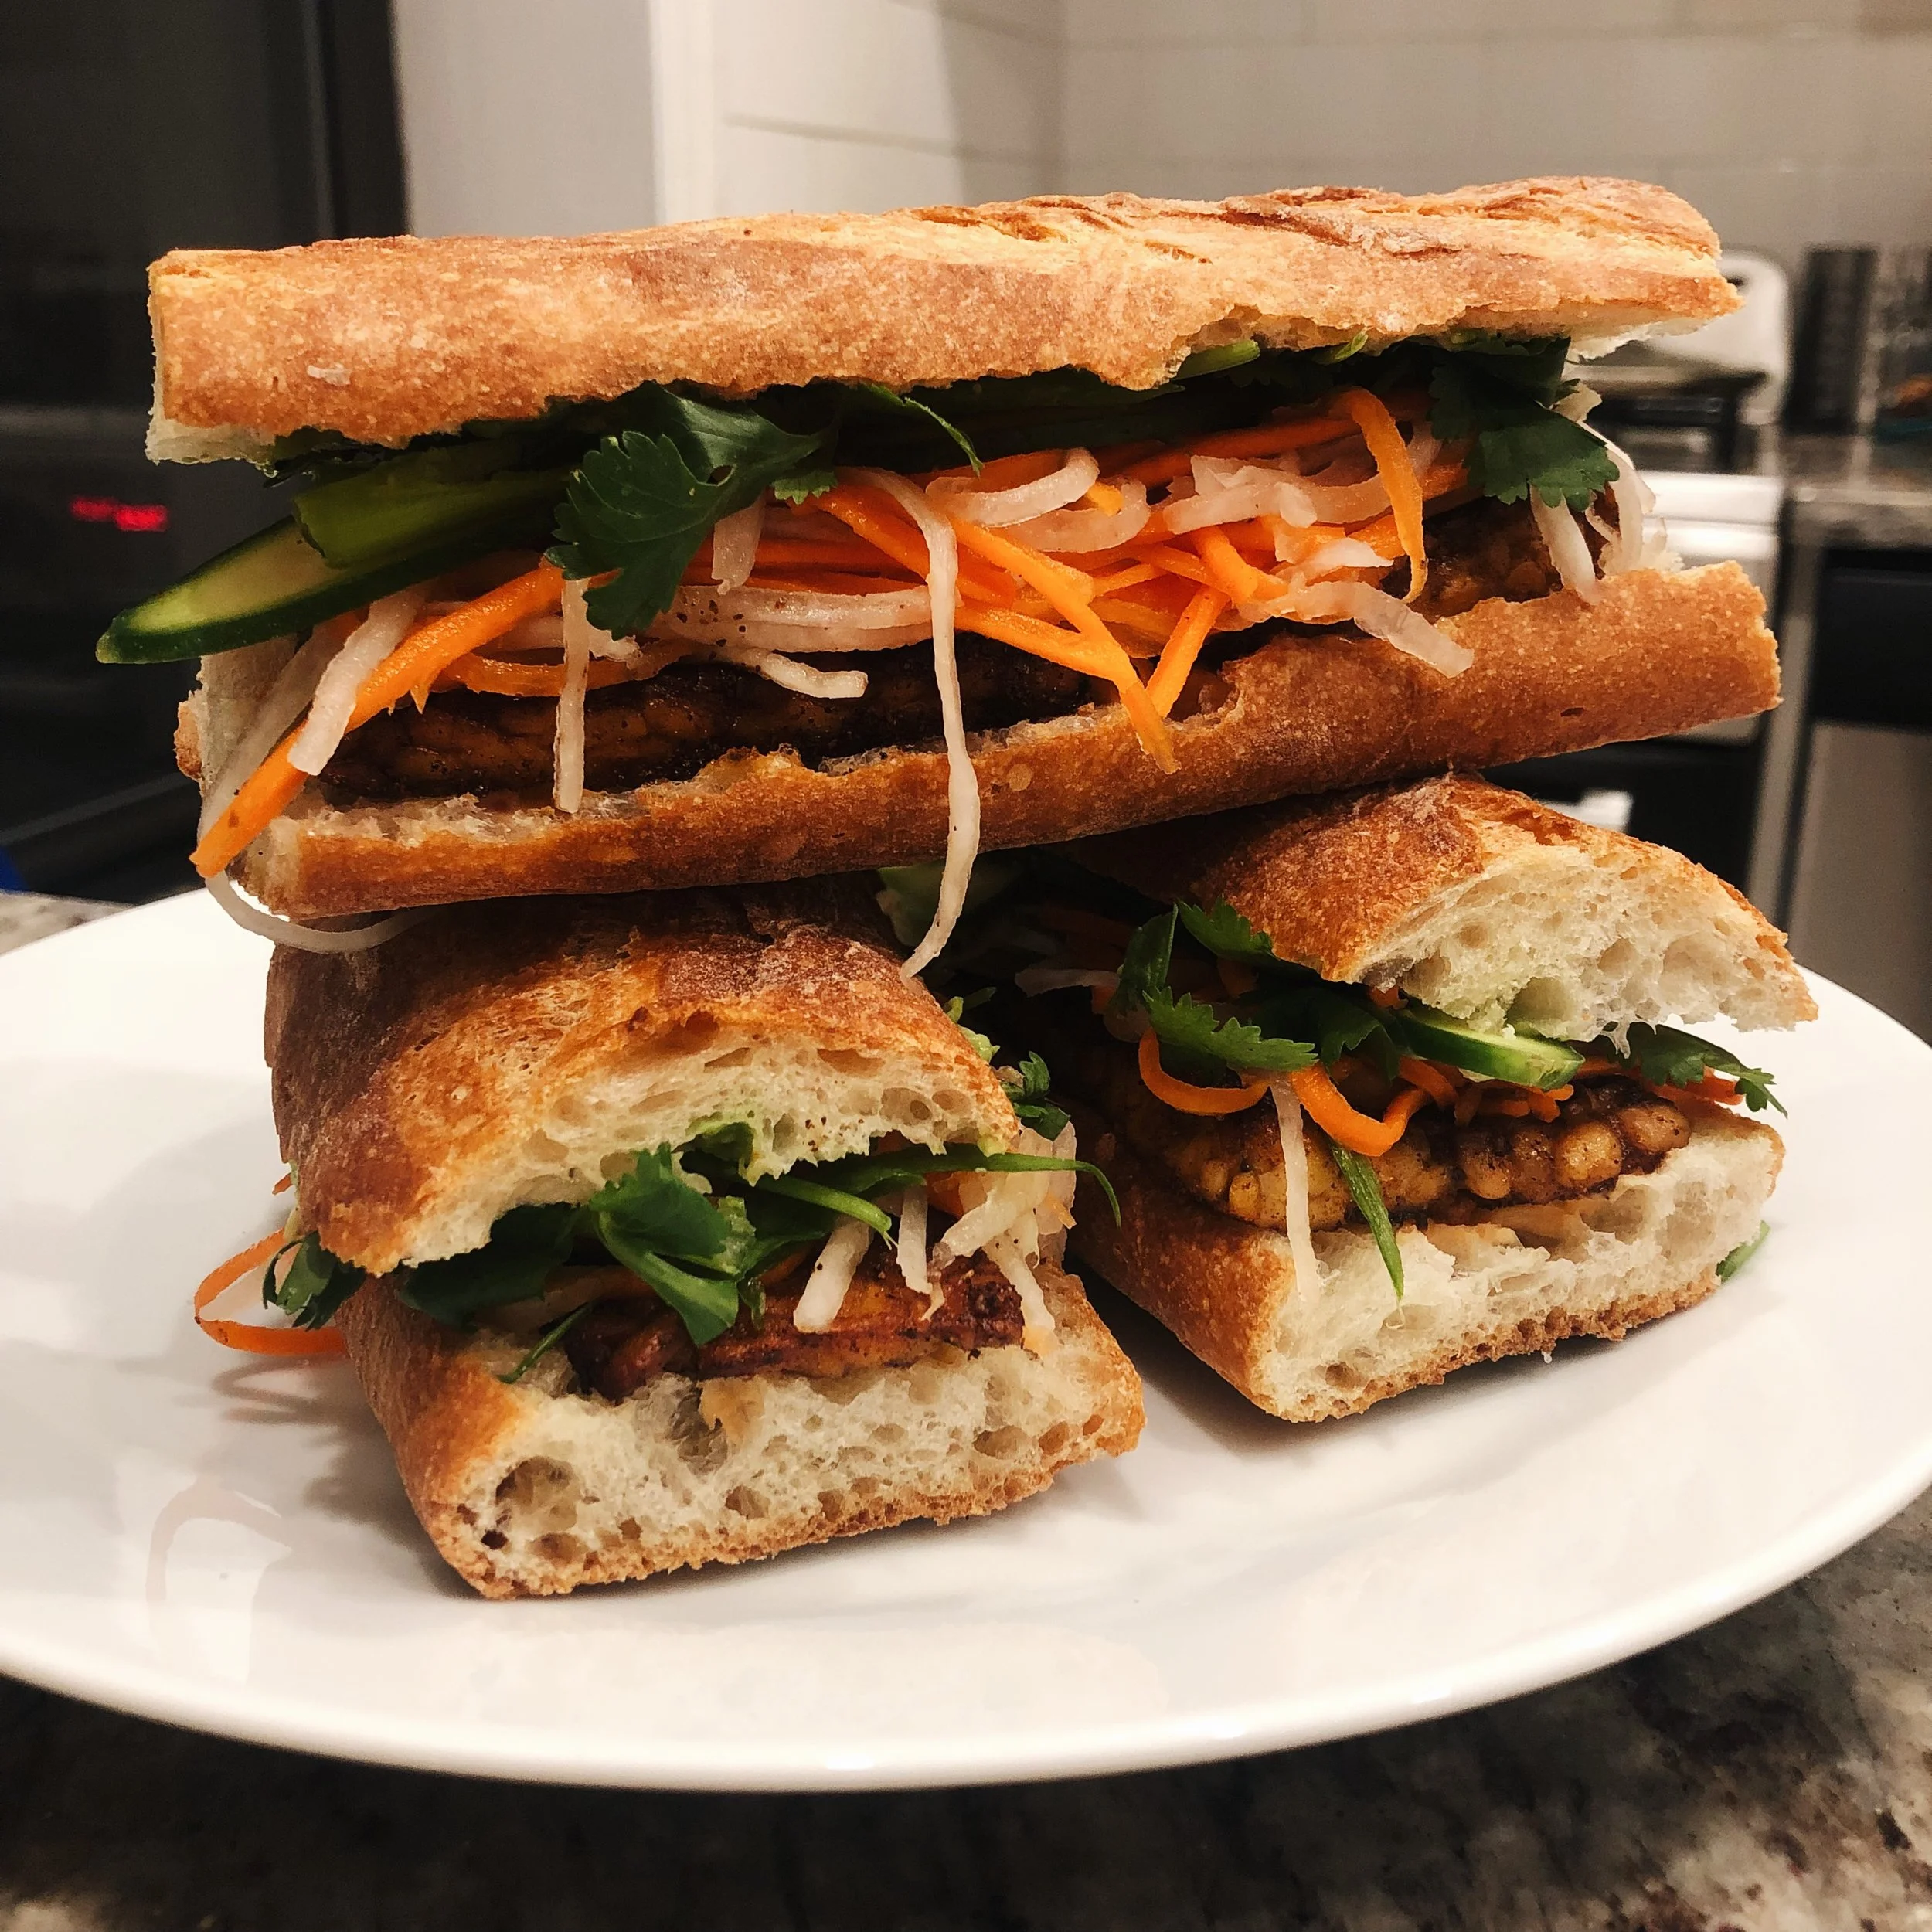
I think banh mi is the perfect sandwich. It’s perfectly balanced: you get acid and tang from the pickled carrots and daikon, crispness from a little bit of sliced cucumber, freshness from the obligatory heaps of cilantro, a hint of spice from the raw scallions and (optional but recommended) jalapeños, and creaminess from the mayo. Then you top the thing off with your protein of choice, and stick it in a crusty-on-the-outside-pillowy-on-the-inside baguette, aka the perfect vehicle for all of those heavenly flavors. It’s the perfect sandwich.

In my experience, it’s pretty hard to come by a satisfying vegan banh mi. The ones that exist just aren’t that good, and I get why - it’s not super authentic, and plant-based options tend to be an afterthought at most restaurants. That’s why I make mine at home. The raw veggies are obviously pretty consistent across restaurants, but at home you can substitute your plant-based protein of choice, and that makes all the difference. I like to use either tempeh or tofu in mine, and if I’m itching for a change, I’ll hammer some oyster mushrooms into oblivion, season them slightly, and that’ll do the trick. Actually, I’ve been really into substituting meat for mushrooms lately - but that is a post for another day.

banhmi.jpg

When the weather starts to get warm, like it is now (sort of - it feels like Spring has been taunting those of us in New York for the entire month of April), this is one of my favorite recipes to make. Why? For one thing, all of the adjectives I already listed above: acid, tang, crispness, freshness. Doesn’t that just spell warm weather? Also, it’s an excellent recipe to meal prep. You can prep a giant jar of pickled carrots and daikon on a Sunday night that will last you through the week. Almost all of the components are raw vegetables, save for the tofu/tempeh/mushrooms, and the fresh baguette you will pick up at your nearby bakery, so the assembly time required for this recipe is basically under 10 minutes.

As if that doesn’t sound great enough, I’ll give you another reason to hop on the banh mi train. With a batch of pickled carrots and daikon in your fridge, you can turn one recipe into three. Recipe #1 is the simple banh mi sandwich, recipe #2 is a banh mi summer roll, and recipe #3 is bun cha, a Vietnamese vermicelli noodle dish that uses similar garnishes.

Want to learn how to make all three? Read on.


Banh mi

Ingredients

  • 2 large carrots, peeled

  • 1 large daikon radish, peeled

  • 1 cucumber, whatever kind you like best, sliced

  • 1 bunch of scallions, chopped

  • 1 bunch of cilantro

  • 1 avocado (optional, but highly recommended)

  • 1 lime

  • 1 jalapeno, thinly sliced

  • 1 baguette

  • Seasoned sushi vinegar (this is the brand I use)

  • Vegan mayo (whatever brand is your favorite)

  • Chili-garlic paste

  • Seared tempeh or tofu from this recipe

Optional add-ons: Sometimes I add some steamed or charred kale to this sandwich. That is definitely not authentic at all, but it does add some extra nutrition and crunch.

IMG-0434.jpg

Instructions

  1. To make the pickled carrots and daikon: Finely julienne your carrots and daikon. You can do this by hand, or I really recommend investing in a (cheap) julienne peeler like this, which will save you a lot of time. Put the veggies in a mason jar, packing them in as tightly as possible. Pour enough sushi vinegar into the jar that it covers the veggies halfway, and then fill the jar with water until the veggies are fully submerged (I do half vinegar/half water because sushi vinegar is very strong). Stick the jar in your fridge and allow at least one day for the flavors to mingle. The pickles will last a really long time, I wouldn’t worry about that because you will definitely finish them quickly.

  2. To assemble the banh mi: Slice your baguette in half. In a small bowl, mix together equal parts vegan mayo and chili-garlic paste (or a hot sauce of your choice). Spread a generous layer of the spicy mayo on one piece of the bread; smash half of the avocado (season with salt/pepper, and squeeze of lime) onto the other half. Layer on your tofu/tempeh, a handful of pickled carrots and daikon, thinly sliced cucumber, cilantro, and jalapeños.


Banh mi summer rolls

Summer roll ingredients:

  • Pickled carrots and daikon (see above)

  • 1 cucumber, julienned

  • 1 bunch scallions, chopped

  • 1 bunch cilantro and/or mint (both make this particularly excellent)

  • 1 avocado, sliced

  • Seared tempeh or tofu from this recipe

  • Rice paper like this

  • Optional add-ons: Again, you can add charred/steamed kale to this to bulk it up more nutritionally.

Dipping sauce ingredients:

  • 1 tbsp juice

  • 1 tbsp low-sodium sauce

  • 2 tsp Sesame seeds

  • Handful of chopped scallions

  • Optional substitute: The spicy mayo from the banh mi recipe above also makes an excellent dipping sauce.

Instructions

  • To cook the rice paper wrappers: Heat a small pot of water over medium heat; when it is hot, but not boiling, transfer to a wide and deep bowl. Working with one rice paper round at a time, soak the rice paper in the warm water, turning occasionally, until just pliable - this takes about 30 seconds. Transfer to a work surface.

  • To assemble the dipping sauce: Combine all ingredients in a small bowl. Set aside.

  • To assemble the summer rolls: Arrange a few pieces of tofu/tempeh across center of round. Top with some cilantro and/or mint lives, pickled carrots and daikon, cucumber, scallions, and avocado. Be careful not to over-fill. Fold bottom of rice paper over filling, then fold in ends and roll like a burrito into a tight cylinder. Transfer roll, seam side down, to a platter and refrigerate.


Bun cha

IMG_9770.jpg

Ingredients (very very similar to above)

  • Pickled carrots and daikon (see above)

  • 1 cucumber, julienned

  • 1 bunch scallions, chopped

  • 1 bunch cilantro and/or mint (both make this particularly excellent)

  • 1 avocado, sliced

  • Seared tempeh or tofu from this recipe

  • Vermicelli noodles like this

  • Optional add-ons: Fresh chopped lettuce (this works much better in this recipe than the kale)

Dipping sauce ingredients

  • 2 tbsp lime juice

  • 2 tsp tablespoons sugar

  • 1 tsp soy sauce

  • 1 tsp minced garlic

  • Optional substitute: The above ingredients are a vegan version of a traditional bun-cha sauce, but this dish is equally delicious served alongside a bit of chili-garlic paste and hoisin sauce (pictured below).

Instructions

  • To cook the vermicelli: Bring a medium pot of water to a boil, remove the pot from the heat, and add the noodles. Let the noodles soak until they're tender, about 5 minutes. Drain and pat dry.

  • To assemble the dipping sauce: Combine all ingredients in a small bowl. Set aside.

  • To assemble the bowls: Place a handful of the vermicelli in a bowl. Top with pickled carrots and daikon, tofu/tempeh, cucumber, cilantro and/or mint, and lettuce.

Recipe: How to make a vegetarian tapas spread

Back in May, I went to Barcelona for 9 days. I have not visited many European cities yet, but I quickly determined that Barcelona is my favorite. I loved the omnipresence of greenery - it made the city feel vibrant and alive in a way that New York never could. I loved the architecture - how simultaneously grandiose and humble it was, and how varied and colorful the facades were. I loved the balconies. I loved the trees. I loved the way it felt like a place where old meets new, which is probably something that can be said about most European cities, but I still loved it about Barcelona. I loved the distinct neighborhoods, and how seamlessly they bled together. We primarily stayed in Gràcia, a lively district that feels like a small village, abuzz with cafes, restaurants, markets, and shops. I loved the people - the street performers, the bartenders, the vendors, the cab drivers, everyone. I was very sad to leave. I could see myself living there so easily. (PS: I shared a few film photos from my trip here).

But this is a food blog, so you must know where this is going. Above all, I loved the food. In Barcelona, most meals are consumed tapas-style, aka small plates. This was not my first time eating tapas, but it was my first time eating real tapas. Spanish-style tapas. Pan con tomate. Patatas bravas. Champinones al ajillo. I fell in love with tapas for three main reasons. (1) The social element: The underlying premise of tapas is about coming together to share a meal with friends. This is a big part of Spanish culture, as far as I can tell. Or maybe it is just such a non-part of American culture that I am thoroughly heart-warmed when I visit a place where it is front and center. (2) The variety: My favorite meal is any meal that allows me to have as many dishes as possible. This is why I love family-style Chinese food and Middle Eastern mezze. This is why I love tapas. (3) The simplicity and modesty: Tapas are (for the most part) humble and straightforward dishes that celebrate fresh ingredients.  Maybe the latter is a Mediterranean thing, but the former is definitely a tapas thing. Nothing fussy, nothing complex. Just really delicious, vibrant food that can be prepared very quickly, and sold for quite cheap.

tapas.jpg

A quick note about being plant-based in Barcelona: I found it surprisingly easy, and also fun. I vowed to only eat food I could find in Spain (no veggie burgers or other familiar meals that I could find at home - but more on my travel eating philosophy in another post). I got to eat all the pan con tomate (my life is forever changed now that this dish is in my life), along with all the hummus, all the olives, all the fried potatoes (sans aioli, but with all the spicy tomato sauce), and a variety of vegetables (shoutout to artichokes, which I did not know I loved, and shoutout to mushrooms, which I continue to love) with a variety of sauces (namely romesco). Of course, I also ate a lot of various olives (also did not know I loved, and now I wholeheartedly do) and a lot of potato chips (who knew these are something of a pre-meal delicacy in Spain?). This is just the tip of the iceberg. I could dedicate an entire post to paella, but I'll save that for if and when I learn how to make paella.

I could go on, but this post is all about my recipes - tonight's attempt to recreate the beautiful spreads of food I encountered during my time in Barcelona. I hope you find them useful, and I hope you feel inspired to recreate it yourself.


Seared asparagus with simple romesco

Ingredients

  • 3 tbsp olive oil
  • As many asparagus spears as you want to eat
  • 2 red bell peppers
  • 2 tbsp tomato paste
  • 1 tbsp red wine vinegar
  • 1/4 cup walnuts (or nut of choice, just use what you have - almonds are traditional)
  • 2 cloves of garlic
  • 1-2 tbsp water
  • 1/4 tsp salt, plus more to taste
  • 1/4 tsp pepper

Instructions

  1. To roast the bell peppers: Preheat oven to 450 degrees. Cut the bell peppers in half vertically and remove the seeds. Line a baking tray with parchment paper and plate peppers cutside-down. Bake for 25-30 minutes, or until skin is charred. Let cool completely before peeling the skin from the peppers (it should peel easily).
  2. To make the romesco sauce: Add roasted peppers to a blender, along with 2 tbsp olive oil, tomato paste, red wine vinegar, walnuts, garlic, salt, and pepper. Blend until mostly smooth, but leave some texture. Add water to thin, if necessary.
  3. To make the asparagus: Add 1 tbsp olive oil to a pan, and heat to medium-high. Add asparagus spears to the pan, and let cook without stirring for several minutes, turning when they begin to turn golden on the bottom. Repeat process until all sides are slightly golden. Finish with salt and pepper.

tapas2.jpg

Garlic mushrooms with parsley

Ingredients

  • Mushrooms of choice, chopped (I prefer wild mushrooms, such as shiitake and oyster, but cremini and portobello work just as well)
  • 2 cloves of garlic, chopped
  • 1 tbsp olive oil
  • 2 tbsp fresh parsley, chopped
  • Lemon (optional, squeeze to garnish)
  • Salt to taste
  • Pepper to taste

Instructions

  1. Heat oil on a pan to medium-high. Add chopped mushrooms and let cook for a few minutes, stirring occasionally, until they release their moisture. Add garlic and let cook a few more minutes.
  2. Continue cooking until the mushrooms take on more golden color (do not stir to often to let this happen). In the final few minutes of cooking, add a handful of parsley and let wilt. Season with salt and pepper to taste.
  3. Plate the mushrooms, garnishing with a handful of fresh parsley, a squeeze of lemon juice (optional), and a drizzle of garlic-infused olive oil (also optional).

Simple creamy hummus

Ingredients

  • 1 15-oz can of chickpeas
  • 1/4 cup tahini (this is the brand you should buy, it's the best)
  • Juice of 1/2 lemon
  • 2-3 cloves of garlic, depending on your taste
  • 1/2 cup ice cold water
  • 1 tsp salt
  • 1/2 tsp freshly cracked black pepper
  • Olive oil (optional, for garnish)
  • Smoked paprika (optional, for garnish)

Directions

  1. Drain and rinse the can of chickpeas (reserve the liquid from the can if you want - known as aquafaba, it can be used to make many other amazing things).
  2. Peel the chickpeas. The skins come off pretty easily when you gently “pinch” each chickpea (you can discard the skins when you are done). Try not to skip this step - it is the secret to creamy and smooth hummus.
  3. Combine all ingredients except for the water in a food processor or blender. Blend until almost smooth - it will be rather thick.
  4. Once everything is well incorporated, add the ice water and blend until smooth. The ice water is another secret to good hummus - it reacts with the fat in the tahini and helps make the hummus light and fluffy.
  5. Serve with a drizzle of good quality olive oil and a sprinkle of smoked paprika.

Patatas bravas

Ingredients

  • 1 large potato, quartered into bite size pieces (I used a yellow potato,)
  • 1 tbsp olive oil
  • 1/2 tsp garlic powder
  • 1/4 tsp smoked paprika
  • salt to taste
  • 1/2 yellow onion, diced
  • 3 cloves garlic, minced
  • 1/2 tsp paprika
  • Pinch of red pepper flakes, plus more to taste if you like spice
  • 1 6-oz. can tomato paste
  • 1 1/2 cups water
  • 2-3 tsp hot sauce (I recommend chili garlic Cholula)
  • 2 tbsp vegan mayonnaise (I like Sir Kensington's)
  • Squeeze fresh lemon juice

Directions

  1. For the potatoes: Soak chopped potatoes in cold water (helps achieve maximum crispiness). In the meantime, preheat oven to 450 degrees. Drain potatoes and pat dry, then season with garlic powder, smoked paprika, and salt. Toss to coat everything evenly. Roast potatoes for 30-35 minutes or until golden brown and crispy, tossing once midway through.
  2. For the spicy tomato sauce: Head 1 tbsp olive oil in a pan over medium heat. Add onion and garlic and cook for 5 minutes until translucent and fragrant. Add paprika, tomato paste, hot sauce, water, salt, and pepper, and stir. Cook for at least 10 minutes until flavors are well-combined, tasting and adjusting seasonings as needed. For a smooth sauce, transfer the mixture to a food processor or blender and blend until smooth.
  3. For vegan aioli: Combine vegan mayo, lemon juice, and a pinch of garlic powder in a bowl and mix well.

Pan con tomate

Ingredients

  • 2 large beefsteak tomatoes
  • 2 cloves garlic
  • Olive oil
  • Flaky sea salt
  • Bread of choice (ideally somewhat crusty, and not too soft)

Directions

  1. Slice tomatoes in half horizontally. Grate tomatoes using a box grater until all flesh is grated off, while the skin remains intact. Season the tomato pulp with kosher salt to taste.
  2. Preheat onion to broil. Drizzle bread with olive oil, and place directly on the oven rack, cut-side up. Let toast for 2-3 minutes, or until edges are toasted.
  3. Remove bread from oven and rub generously with raw garlic cloves. Spoon tomato mixture over bread. Drizzle with more extra-virgin olive oil and season with flaky sea salt.


Blistered padrón peppers

Ingredients

  • 1 package of padrón/shishito/twist peppers (they have different names depending where you buy them, but they are basically the same thing - mine were labeled "twist peppers")
  • 1 tbsp olive oil
  • Salt to taste

Directions

  1. Heat oil over medium-high in a pan. Add peppers and cook, turning occasionally until they begin to blister on all sides. Sprinkle with salt and serve immediately.


Simple Mediterranean salad

Ingredients

  • 1 head of lettuce (I used butter lettuce because I am really liking it lately, but romaine or mixed greens are also totally fine)
  • 1/2 red onion, shaved (I used a mandolin to get mine super fine)
  • 1/2 English cucumber, sliced thin (used mandolin)
  • 1 beefsteak tomato, de-seeded and cut into chunks
  • Handful olives
  • Drizzle olive oil
  • Drizzle red wine vinegar to taste
  • Salt to taste
  • Pepper to taste

Directions

  1. Combine all ingredients in a bowl and toss to combine.

Recipe: Truffle mushroom spaghetti with roasted broccolini

More or less by accident, this became the recipe that came to define my winter. Now that winter is over (go figure), and now that I have perfected my recipe (more or less), I thought I would share it on the blog.

FFE30196-73EA-44EB-AA0F-79F303B04D96.JPG

The recipe originates from two places:

1. My love for mushrooms
2. My curiosity around truffle oil

Let's talk about mushrooms. I hated them when I was growing up, in the sense that I never tried them but decided from an early age that I thought they were gross and I would never eat them (this was the case for all vegetables except baby carrots and cucumber). Today, mushrooms are maybe my favorite vegetable (I don't know how or when this changed). I love how many varieties there are, and I have a particular affinity for wild mushrooms (oyster, shiitake, maitake, chanterelle, etc.). Every once in awhile I realize that I can more readily rattle off names of wild mushrooms than I can rattle off names of U.S. presidents, and this just makes a lot of sense to me.

As for truffle oil, I have always wanted to buy some. It was the kind of thing that always sat in my Amazon cart, but which I never bought because I couldn't quite justify the purchase. In my experience, here is how those things play out: one day, you walk into a store and see said thing in person, and think to yourself, "well $25 for a tiny bottle of fancy oil that is absolutely not fundamental to my pantry isn't so bad." So I bought some.

That same afternoon, shortly after I picked up the tiny bottle of $25 truffle oil, I also picked up: fresh oregano and thyme, garlic, shallots, and broccolini. I remembered that there was spaghetti in my pantry, and the whole thing came together from there. The specificity of this recipe was kind of born by accident - in the sense that I don't believe I had ever cooked broccolini before, but I did that night, and now it is one of my favorite vegetables and the only one I have ever paired with this pasta. I am not saying that you have to pair your truffle mushroom pasta with broccolini, but I am saying that you should - it is very good. 

Anyway, that's enough of the slightly-tangential-but-mostly-unrelated ramble that begins most recipe posts on food blogs. Let's get into how to make this dish.

Truffle mushroom spaghetti with roasted broccolini

Ingredients

  • 1 package pasta of your choice (I tend to go for spaghetti for this, but it's really up to you)
  • 1 lb broccolini (I made up the portion here, I just buy one "package" from my local supermarkets; also this is sometimes called broccolette I just learned?)
  • 1-2 lbs mushrooms, sliced (use what you like, what you have, or what you can afford; like I said above, I love wild mushrooms, but they're usually more expensive - cremini and portobello work just as well!)
  • 1-2 shallots, diced
  • 1-2 cloves garlic, minced (or 3-4 if you are me, aka do you)
  • 1-2 tbsp fresh herbs (again, your choice - I like oregano and thyme; I have also substituted the fresh herbs for dried herbs de Provence, maybe 1-2 tsp)
  • 2-3 tbsp olive oil
  • 1-2 tsp truffle oil
  • 1/2 tsp garlic powder
  • 1/4 tsp salt
  • 1/4 tsp pepper
  • chili flakes to garnish

Instructions

  1. Preheat oven to 425 degrees, and bring a large pot of water to boil for the pasta. Add the pasta to the boiling water, along with a pinch of salt, and cook according to package instructions.
  2. Line a baking sheet with parchment paper or foil, and add broccolini. Drizzle about 1 tbsp olive oil on top, along with the garlic powder, salt, and pepper. Mix evenly with your hands, and then place in the oven to roast for approximately 25-30 minutes, or until the florets are slightly crisp and golden.
  3. Heat a pan on medium-low. When warm, add 1 tbsp of oil, followed by diced shallots. Cook until the shallots are transparent, then add minced garlic. Cook for one minute more, or until fragrant, careful not to burn the garlic. Next, add your chopped fresh herbs, and stir (or dried herbs de Provence).
  4. Add the mushrooms to the pan, tossing in the oil/shallot/garlic/herb mixture to coat. Turn the heat up to medium-high, and cook until the mushrooms have released their moisture and are soft. Once this happens, turn the heat up even more, and let cook without turning. This allows the mushroom to develop some color and maybe even some crisp - if you're into that (I am). Remove from heat.
  5. As soon as your pasta is drained, quickly add a drizzle of olive oil (about 1 tbsp) to prevent sticking. Stir in the sautéed mushroom mix. Your kitchen should be smelling pretty good at this point.
  6. Drizzle in the truffle oil. Your kitchen will definitely be smelling very good at this point.
  7. Plate the pasta with as many mushrooms as you desire, and serve alongside roasted broccolini. Garnish the pasta with fresh cracked black pepper, chili flakes, and chopped fresh herbs.
  8. Optional: I also like to serve this with a simple mixed green salad, as pictured - that is really just mixed greens tossed with a little bit of olive oil and balsamic vinegar. 
  9. Optional: When I am not so lazy, I top the pasta with a little bit of cashew parm - that is really just cashews, garlic powder, nutritional yeast, and salt blended together until it resembles parm (kind of).

Enjoy! This probably serves 4 people.